Discover Django Servers with Bonjour
Running a Django server that provides content to an iOS client is
a combination that’s worked great for the apps I’ve worked on.
Getting everything talking to each other is easy as long as both
processes are running on the same machine: just run the Django server
as usual, then run the iOS app in the simulator and point it to localhost.
Some iOS features, though, are hard to test in the simulator.
Barcode scanning, accelerometer tracking, and other hardware features
can only be tested on a real device. But running the app on a device
means you can’t just say localhost and expect to connect to your laptop;
you’ll need a way to reference your development machine without using the IP
address, which changes too often to be useful.
This is exactly what Bonjour is for. Bonjour is Apple’s implementation of “zero configuation networking,” which lets apps publish and browse network services.
Finding a Server the Easy Way
Among other things, Bonjour gives your machine a hostname in the .local
domain, which stays constant even as your IP changes.
You can find your machine’s Bonjour hostname in the Sharing pane of System Preferences.
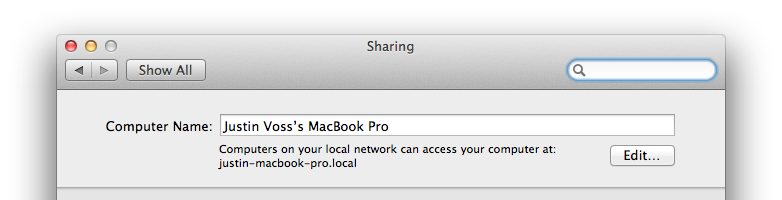
You can see that my laptop goes by the name justin-macbook-pro.local. In my iPhone app,
instead of connecting to localhost:8000, I’ll instead connect to justin-macbook-pro.local:8000.
There is no Step 2; it’s really that easy! No matter how many times my laptop changes
it’s IP address, that hostname will always resolve to the right machine. Now I can run
my iPhone app on a real device and it’s almost as easy as when everything was on localhost
(you do have to remember to tell Django to listen on all interfaces: just say
manage.py runserver 0.0.0.0:8000).
There’s an obvious downside, though: now my machine name is in the code. What if I’m not the only developer on the project? Is everyone going to maintain their own version of the configuration, with their own hostname in place of mine? That would work, but it just feels icky, to use a technical term.
What if we didn’t have to hard-code anything at all, and the iPhone app could discover the server totally automatically?
Finding a Server the Over-Engineered Way
Let’s publish our Django server as a full-fledged Bonjour service, and then write some iOS code to browse for it.
Publishing
Apple has some Objective-C APIs for publishing services, and there’s at least
one Python library that claims to do the same, but there’s an even easier way:
a commandline tool called dns-sd (read the man page for details).
In a nutshell, invoking dns-sd follows this format:
dns-sd -R <name> <type> <domain> <port>
Breaking it down a piece at a time:
- The
-Rmeans we want to register (i.e., publish) a service. - The name should be a human-readable description of this instance of the service. For example, an iTunes library uses a name like “Justin’s Library”.
- The type is a Bonjour service type. This follows a format that puts the scheme
first and the network protocol second. For example, a web server is of the type
_http._tcp. You can and should make up your own types, like_myapp._tcp. - The domain is what Bonjour domain to publish this service to. In general,
you almost always want to use
local. - Finally, the port is what port your app is listening for connections on. For Django, this is usually 8000.
So, our hypothetical Django server would be published like so:
dns-sd -R "App API on Justin's MacBook" _myapp._tcp local 8000
To make life easier, I’ve written a Python script called runserver-bonjour
that will both run your Django project and publish it using Bonjour.
Side Note: Bonjour Types
A Bonjour type, like _http._tcp, is used to filter for specific services.
Unless you’re trying to be a drop-in replacement for something else, your app
should have it’s own unique type. In these examples, I’m using _myapp._tcp.
There’s a list of all registered types that has lots of examples.
You might be thinking, “Wait, aren’t we just an HTTP server? Why not use _http._tcp?”
We don’t want to do that, because the fact that our service uses HTTP as a transport
should be considered an implementation detail. The _http._tcp type has a very specific use:
it’s for servers that deliver web pages intended to be displayed in a browser.
That’s not what our server does: it’s an API, not web pages, so that’s not the right type for us.
To use a real example, when you enable iTunes music sharing, your copy of iTunes
starts up an embedded web server: the music sharing is actually done over HTTP.
But iTunes uses the Bonjour type _daap._tcp to distinguish itself from other HTTP servers.
Your app should use the same strategy.
Browsing
Finding a Bonjour service isn’t too hard, but it does involve two layers
of delegation, which can make the code hard to follow. There are two phases:
in the first, we’ll browse for any services that match the type we want (_myapp._tcp);
then, we’ll pick a single service and resolve it, which will tell us the hostname
and port to connect to.
To browse for services, you need an NSNetServiceBrowser. Give it a delegate,
then tell it what type of services you want (FYI, all these code samples are using ARC).
self.serviceBrowser = [NSNetServiceBrowser new];
self.serviceBrowser.delegate = self;
[self.serviceBrowser searchForServicesOfType:@"_myapp._tcp" inDomain:@""];
Passing in an empty string for the domain means you want the default domain, local.
As the service browser finds services, it notifies the delegate. It calls the delegate once per service, so if you want to do something with the whole collection of them, you need to maintain a list yourself.
- (void)netServiceBrowser:(NSNetServiceBrowser *)aNetServiceBrowser
           didFindService:(NSNetService *)aNetService
               moreComing:(BOOL)moreComing
{
    // __foundServices is an NSMutableArray
    [__foundServices addObject:aNetService];

    if (!moreComing) {
        [self resolveFirstService];
    }
}
The moreComing parameter is a hint that there may or may not be more pending calls to this method.
Apple recommends using this flag to determine when to update your UI, but in this
case I’m using it to decide when to stop browsing and start resolving.
- (void)resolveFirstService
{
    NSNetService *service = [__foundServices objectAtIndex:0];
    service.delegate = self;
    [service resolveWithTimeout:10.0];
}
In some apps, you might want to let the user choose which service to use. For our purposes, we can assume there’s usually only one service, so we’ll just grab the first one and resolve it. This is where the second level of delegation happens: the service needs a delegate to notify when it finishes resolving.
- (void)netServiceDidResolveAddress:(NSNetService *)sender
{
    NSLog(@"Resolved service with hostname=%@, port=%d", sender.hostName, sender.port);
}
At this point, you have all the info you need to connect to this service.
I just take the hostname and port, slap them together with +[NSString stringWithFormat:],
then create an NSURL from that.
I put together a class to handle the details for me, called RBServerLocator
(The RB prefix is to match runserver-bonjour). Using it is as easy as specifying
the type and providing a completion block that takes a resolved service.
There’s even a category on NSNetService to create an HTTP URL for you.
[[RBServerLocator sharedLocator] locateServerMatchingType:@"_myapp._tcp"
                                               completion:^(NSNetService *service) {
                                                   NSLog(@"found server: %@", [service RBResolvedURL]);
                                               }];
Further Reading
This short trip through Bonjour doesn’t nearly do it justice: it’s a powerful toolkit for sharing and discovering other apps and devices. Apple’s Bonjour Overview can take you an a deep dive into everything it has to offer.